Concepts or coding lessons of Salesforce that you can implement easily

Showing posts with label visualforce page. Show all posts

Import CSV file In Salesforce using Apex in 3 Easiest Steps

Salesforce does not read the excel file into apex. To overcome for this either we can covert excel file to CSV and import csv file using below code.

We can import data using data loader But sometime there is requirement when end users do not want to use Apex Data loader. 

Client want custom page to load data in salesforce.

Here I am explaining Import CSV file In Salesforce using Apex. Below is the code snippet which import CSV file from apex. In this blog, I have one visual force page and one controller associated with it. 

Visual force page have Import Accounts into Salesforce button. 
Once user click on the button, I am sending email using apex code. 

Step 1: Go to setup and Create one Apex Controller

public class importDataFromCSVController {

  public Blob csvFileBody{get;set;}
  public String csvAsString{get;set;}
  public String[] csvFileLines{get;set;}
  public List<account> accountlist{get;set;}
  public importDataFromCSVController(){
    csvFileLines = new String[]{};
    accountlist= New List<Account>(); 
  }
  
  public void importCSVFile(){
       try{
             // Read CSV file body and store it in variable
              csvAsString = csvFileBody.toString();
  
            // Split CSV String to lines
             csvFileLines = csvAsString.split('\n'); 
           
            // Iterate CSV file lines and retrieve one column at a time.
             for(Integer i=1; i < csvFileLines.size(); i++){
               Account accObj = new Account() ;
               String[] csvRecordData = csvFileLines[i].split(',');
               accObj.name = csvRecordData[0] ;             
               accObj.accountnumber = csvRecordData[1];
               accObj.Type = csvRecordData[2];
               accObj.AccountSource = csvRecordData[3];   
               accObj.Industry = csvRecordData[4];                                                                             
               accountlist.add(accObj);   
             }
            // if all correct then insert Account into Org
             if(accountlist.size()>0)
             insert accountlist;
        }
        catch (Exception e)
        {
            ApexPages.Message errorMessage = new ApexPages.Message(ApexPages.severity.ERROR,'An error has occured while importing data into Salesforce. Please make sure input csv file is correct');
            ApexPages.addMessage(errorMessage);
        }  
  }
}

Step 2: Create Visual force Page

<apex:page controller="importDataFromCSVController" sidebar="false" showHeader="false">
    <apex:form >
        <apex:pagemessages />
        <apex:pageBlock >
            <apex:pageBlockSection columns="4"> 
                  <apex:inputFile value="{!csvFileBody}"  filename="{!csvAsString}"/>
                  <apex:commandButton value="Import Accounts into Salesforce" action="{!importCSVFile}"/>
            </apex:pageBlockSection>
        </apex:pageBlock>
        <apex:pageBlock >
           <apex:pageblocktable value="{!accountlist}" var="acc">
              <apex:column value="{!acc.name}" />
              <apex:column value="{!acc.AccountNumber}" />
              <apex:column value="{!acc.Type}" />
              <apex:column value="{!acc.Phone}" />
              <apex:column value="{!acc.Fax}" />
        </apex:pageblocktable>
     </apex:pageBlock>
   </apex:form>
</apex:page>

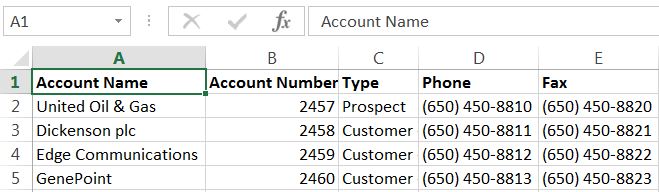
Step 3: Download csv file into local machine. Click here to download CSV file. 

CSV will be like:


Visualforce page have Preview button, you can click on that Preview button. 
OR 
Go to an URL and type or you can paste below URL (Change the salesforceinstancename with your salesforce org URL).

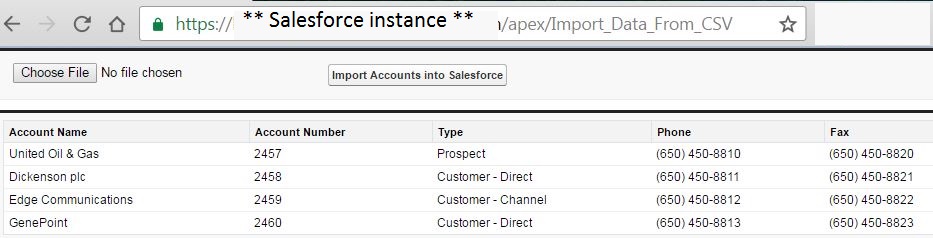
Go to : https://salesforceinstancename/apex/Import_Data_From_CSV .
Load the downloaded CSV file and Click on Import Accounts into Salesforce button

Output:


Note: If the CSV file size are large then you will hit a apex governor limit such as the the 6M byte heap space or the 10 seconds of CPU or the 10,000 rows of DML or the "Regex too complicated" error when importing a large amount of data from a CSV file.

There are other ways to import data into Salesforce.
Check out my other blog: 5 Quick Steps To Install Apex Data Loader.


Enjoy! If you have any questions, comments etc. please feel free to let me know. As always, please feel free to get in touch me as I would be more than happy to assist you with any of your Salesforce development needs.

Next post: Check out Salesforce Daily Limit Only in 5 Simplest Steps

Learning Pagination In Salesforce Is Not Difficult At All ! You Just Need 3 Easy Steps

It is very easy to implement pagination using standard set controller provided by salesforce in visualforce page. You can decide how many records should be displayed in every page also you can easily navigate through pages, move directly to first, last page or to next or previous pages using standard set controller. 

Pagination is very useful when you want to display 1000+ records on visual force page. Without pagination if you try to display 1000+ records on visualforce page then you face visualforce error "Collection size xxxx exceeds maximum size of 1000"

Below example displaying all opportunities in visualforce page with pagination. Default page size 10.

Step 1: Create apex class

public class OpportunitiesPaginationController{
    Public Integer size{get;set;} 
    Public Integer noOfRecords{get; set;} 
    public List<SelectOption> paginationSizeOptions{get;set;}
         
    public OpportunitiesPaginationController(){
        size=10;
        paginationSizeOptions = new List<SelectOption>();
        paginationSizeOptions.add(new SelectOption('5','5'));
        paginationSizeOptions.add(new SelectOption('10','10'));
        paginationSizeOptions.add(new SelectOption('20','20'));
        paginationSizeOptions.add(new SelectOption('50','50'));
        paginationSizeOptions.add(new SelectOption('100','100'));
    }
     
    public ApexPages.StandardSetController setCon {
        get {
            if(setCon == null) {                
                setCon = new ApexPages.StandardSetController(Database.getQueryLocator(
                      [select id,Name,AccountId,Account.name,Amount,StageName,CloseDate from Opportunity]));
                setCon.setPageSize(size);  
                noOfRecords = setCon.getResultSize();
            }            
            return setCon;
        }
        set;
    }
     
    //Changes the size of pagination
    public PageReference refreshPageSize() {
         setCon.setPageSize(size);
         return null;
    }
    // Initialize variable setCon from below method and return a list of opportunity record    
     
    public List<Opportunity> getOpportunities() {
         return (List<Opportunity>) setCon.getRecords();
    }
}


Step 2: Create Visualforce Page


<apex:page controller="OpportunitiesPaginationController" tabStyle="Opportunity" sidebar="false">
    <apex:form >
        <apex:actionFunction name="refreshPageSize" action="{!refreshPageSize}" status="fetchStatus" reRender="pbId"/>
        <apex:pageBlock id="pbId">
            <apex:pageBlockSection title="All Opportunities" collapsible="false" columns="1">
                <apex:pageBlockTable value="{!Opportunities}" var="oppObj">
                     
                    <apex:column headerValue="Opportunity Name">
                        <a href="/{!oppObj.id}" target="_blank" ><apex:outputField value="{!oppObj.Name}"/></a>
                    </apex:column>
                     
                    <apex:column headerValue="Account Name">
                        <a href="/{!oppObj.AccountId}" target="_blank" ><apex:outputField value="{!oppObj.Account.name}"/></a>
                    </apex:column>
                     
                    <apex:column headerValue="Amount">
                        <apex:outputField value="{!oppObj.Amount}"/>
                    </apex:column>
                     
                    <apex:column headerValue="Stage">
                        <apex:outputField value="{!oppObj.StageName}"/>
                    </apex:column>
                     
                    <apex:column headerValue="Close Date">
                        <apex:outputField value="{!oppObj.CloseDate}"/>
                    </apex:column>
                </apex:pageBlockTable>
                 
                <apex:panelGrid columns="8"> 
                 
                <apex:selectList value="{!size}" multiselect="false" size="1" onchange="refreshPageSize();">
                    <apex:selectOptions value="{!paginationSizeOptions}"/>
                </apex:selectList>
                 
                <apex:commandButton status="fetchStatus" reRender="pbId" value="First" action="{!setCon.first}" disabled="{!!setCon.hasPrevious}" title="First Page"/> 
  
                <apex:commandButton status="fetchStatus" reRender="pbId" value="Previous" action="{!setCon.previous}" disabled="{!!setCon.hasPrevious}" title="Previous Page"/> 
  
                <apex:commandButton status="fetchStatus" reRender="pbId" value="Next" action="{!setCon.next}" disabled="{!!setCon.hasNext}" title="Next Page"/> 
  
                <apex:commandButton status="fetchStatus" reRender="pbId" value="Last" action="{!setCon.last}" disabled="{!!setCon.hasNext}" title="Last Page"/> 
  
                <apex:outputText >{!(setCon.pageNumber * size)+1-size}-{!IF((setCon.pageNumber * size)>noOfRecords, noOfRecords,
                     (setCon.pageNumber * size))} of {!noOfRecords}
                </apex:outputText> 
                       
                <apex:outputPanel >                      
                    <apex:actionStatus id="fetchStatus" >
                        <apex:facet name="start" >
                          <img src="/img/loading.gif" />                    
                        </apex:facet>
                    </apex:actionStatus>
                </apex:outputPanel> 
  
            </apex:panelGrid>  
            </apex:pageBlockSection>
        </apex:pageBlock>
    </apex:form>
</apex:page>


Step 3: Click on Preview button of visualforce page


Or 
You can Go to the URL and type (Change the yoursalesforceinstance with your salesforce org URL)

https://yoursalesforceinstance.com/apex/OpportunitiesPagination.


When you use pagination, an exception is thrown when there are modified rows in the collection. This includes any new rows added to the collection through an extension action. The handling of error messages in this case follows the standard behavior and can either be displayed upon the page. For example, you can use the <apex:pageMessages> or <apex:messages> component to display an error message to the user.


Pros and Cons of Choosing This Pagination Tool


Pros:
  • Manages data sets on the server, which reduces page state and increases performance
  • Allows you to paginate over large data sets that have up to 10,000 records
  • Includes built-in functionality such as next, previous, first, last, getResultSize, and other methods that can simplify your page
  • Allows you to paginate forward and backward or to any page within the result set
  • Uses a server-side cursor to cache the entire result set, so results will not change if data changes in the database while a user is paginating from one page to the next.
Cons:
  • Has built-in functionality that results in a very small increase in view state size
  • Can be used only in Apex.

There is a good article about pagination in Apex here: https://developer.salesforce.com/page/Paginating_Data_for_Force.com_Applications that lists various options.

Enjoy! If you have any questions, comments, please feel free to let me know. 

As always, please feel free to get in touch me as I would be more than happy to assist you with any of your Salesforce development needs.

Next post: How To Learn Get Field Values From Visualforce Page To Apex Class Controller Without Losing Your Mind

How To Learn Get Field Values From Visualforce Page To Apex Class Controller Without Losing Your Mind

Here I am explaining Get Field Values From Visualforce Page To Apex Class Controller. Below is the sample code snippet, I have created one controller class and one visual force page associated with it. 

Visual force page has to Submit button. 


Once a user clicks on the button, I am sending email using apex code. 
Check below sample code:


Step 1. Create Apex Controller with name passparamFromVFtoController

Public with sharing class passparamFromVFtoController {
  Public string myInputQueryString{get;set;}
  Public string myoutputString{get;set;}
   
  Public void myInputQuery(){
   System.debug("Inserted string is :- "+ myInputQueryString);
   myoutputString = myInputQueryString ;
   System.debug("Output string is :- "+ myoutputString);
  }
}

Step 2. Create Visualforce Page with name passparamFromVFtoController
<apex:page controller="passparamFromVFtoController" sidebar="false" showHeader="false">
  <!-- Pass parameters from visualforce page to controller -->
  <apex:form >
    <apex:pageblock >
     Input your question=> <apex:inputText value="{!myInputQueryString}"/>
     <apex:commandButton value="Submit" reRender="DisplayInputQueryID" action="{!myInputQuery}"/>
    </apex:pageblock>
     <apex:pageblock >
       <b>Output : </b><apex:outputText value="{!myoutputString}" id="DisplayInputQueryID"/>
     </apex:pageblock>
    </apex:form>
</apex:page>

Output :

You can click on Preview button which is on Visualforce page 
OR 
You can Go to the URL and type (Change the salesforceinstancename with your salesforce org URL).


Go to : https://salesforceinstancename/apex/passparamFromVFtoController.


There is another way: JavaScript Remoting


JavaScript Remoting is a framework or tool that front end developers can use to make an AJAX request from a Visual force page directly to an Apex controller. JavaScript remoting allows you to run asynchronous action by separating the page from the controller and to perform tasks on the page without having reloading the entire page.
JavaScript Remoting is the well-organized and competent way of calling the controller in an asynchronous manner and passing data in from the page, because you are sure that you are passing only that data which you need each time that you make a call.

Step 1: Create an Apex controller called AccountRemoterClass

global with sharing class AccountRemoterClass {

    public String accountName { get; set; }
    public static Account account { get; set; }
    public AccountRemoterClass () { } // empty constructor
    
    @RemoteAction
    global static Account getAccount(String accountName) {
        account = [SELECT Id, Name, Phone, Type, NumberOfDepartments__c 
                   FROM Account WHERE Name = :accountName];
        return account;
    }

}

Step 2: Create a Visualforce page that looks like this:

<apex:page controller="AccountRemoterClass">
    <script type="text/javascript">
    function getRemoteAccount() {
        var accountName = document.getElementById('accountSearch').value;

        Visualforce.remoting.Manager.invokeAction(
            '{!$RemoteAction.AccountRemoterClass.getAccount}',
            accountName, 
            function(result, event){
                if (event.status) {
                    // Below line fetch Visualforce elements and DOM IDs for HTML
                    document.getElementById('remoteAcctId').innerHTML = result.Id
                    document.getElementById(
                        "{!$Component.block.blockSection.secondItem.acctNumEmployees}"
                        ).innerHTML = result.NumberOfEmployees;
                } else if (event.type === 'exception') {
                    document.getElementById("responseErrors").innerHTML = 
                        event.message + "<br/>\n<pre>" + event.where + "</pre>";
                } else {
                    document.getElementById("responseErrors").innerHTML = event.message;
                }
            }, 
            {escape: true}
        );
    }
    </script>

    <input id="accountSearch" type="text"/>
    <button onclick="getRemoteAccount()">Get An Account</button>
    <div id="responseErrors"></div>

    <apex:pageBlock id="block">
        <apex:pageBlockSection id="blockSection" columns="2">
            <apex:pageBlockSectionItem id="firstItem">
                <span id="remoteAcctId"/>
            </apex:pageBlockSectionItem>
            <apex:pageBlockSectionItem id="secondItem">
                <apex:outputText id="acctNumEmployees"/>
            </apex:pageBlockSectionItem>
        </apex:pageBlockSection>
    </apex:pageBlock>

</apex:page>

Below are the JavaScript Remoting Limits:


Remote call`s default response time is 30 seconds. If remote call taking longer time than 30 seconds then you will get a time out exception.
If your request requires more time to complete the transaction, then configure a longer timeout. You can setup it to 120 seconds. 
Most of the interviewer asks the question, what is the maximum response size of your remote call ?
Answer is : maximum 15 MB.

Enjoy! If you have any questions, comments etc. please feel free to let me know. As always, please feel free to get in touch me as I would be more than happy to assist you with any of your Salesforce development needs.


Actionpoller Tag in Visualforce Page

Action poller is acts as a timer in visual force page. A timer that sends an AJAX request to the Salesforce server according to a time interval that you specified.
The time interval between AJAX update requests is always be in seconds. 
This timer value must be 5 seconds or greater than 5, and if it not specified, then defaults to 60 seconds. 

In this article, I will demonstrate how to use <apex:actionpoller> in visual force page.

Create Visualforce Page -->

<apex:page controller="exampleCon">
    <apex:form>
        <apex:outputText value="This counter is changing, check this: {!count}" id="counter"/>
        <apex:actionPoller action="{!incrementCounter}" reRender="counter" interval="15"/>
    </apex:form>
</apex:page>


Create Apex Controller: -->

public class exampleCon {
    Integer count = 0;

    public PageReference incrementCounter() {
        count++;
        return null;
    }

    public Integer getCount() {
        return count;
    }
}

Note that if an <apex:actionPoller> is ever re-rendered as the result of another action, then this tag resets itself. An <apex:actionPoller> must be within the region where it acts upon. 
For example, to use an <apex:actionPoller> tag with an <apex:actionRegion> tag, the <apex:actionPoller> tag must be within the <apex:actionRegion> tag.

Check below point while using <apex:actionPoller>


  • Action methods used by <apex:actionPoller> tag should be lightweight. It's a best practice to avoid performing error whcih are occured in DML, external service calls, and other resource-intensive operations in action methods called by an <apex:actionPoller> tag . 
  • <apex:actionPoller> tag refreshes the connection regularly, which keeping login sessions alive. A page with <apex:actionPoller> tag on visualforce won't time out due to inactivity.
  • If an <apex:actionPoller> tag is ever re-rendered as the result of another action, then this tag resets itself.
  • Time out can also be specified as an attribute in actionpoller tag. Once the time out point is reached it stops making AJAX callout to the Salesforce server and no more controller method is called.
Below are the attributes supported by actionpoller tag:


Attribute
Description
action
The action () invoked by the timer for a periodic AJAX update request from the page. Use the merge field syntax to reference the action method. For example, action="{!incrementCounter}" references the incrementCounter() method in the controller. If no an action is specified, then the page simply refreshes.
enabled
This is a Boolean value that indicates whether the poller is active or not. If not specified, then this value defaults to true.
id
An identifier that allows the one component to be referenced by other components in the page.
interval
This is the time interval between 2 AJAX update requests, which is in seconds. interval value must be 5 seconds or greater than that, and if this value is not specified, then by defaults Salesforce take is as 60 seconds. Keep in mind that the interval is only the amount of time between the update requests. Once an update request is sent to the server, it enters a server queue and can take additional time to process and display to the client.
oncomplete
The JavaScript function invoked when the result of an AJAX update request completes on the client.
onsubmit
The JavaScript function invoked before an AJAX update request has been sent to the server.
rendered
A Boolean value that indicates whether the component is rendered on the page or not. If this not specified, then this value defaults to true.
reRender
The ID of one or more components that are redrawn when the result of an AJAX update request returns from a server to the client. This value can be a single ID or can be a comma-separated list of IDs, or a merge field expression for a list or collection of IDs.
status
The ID of a related to the component that displays the status of an AJAX update request. 
timeout
The amount of time specified in milliseconds before an AJAX update request should time out.

Enjoy! If you have any questions, comments etc. please feel free to let me know. As always, please feel free to get in touch me as I would be more than happy to assist you with any of your Salesforce development needs.


Display Helptext In Visualforce Page In Less Time, Check this out

Whenever we override our Salesforce standard page with custom page i.e. by visual force page, there is always be clients/Users many time demand for same Standard page layout inline Help Text bubbles.

The help text that is displayed next to this field as a hover-based tool tip, similar to the text that is displayed next to standard Salesforce fields if custom help is defined for the field in Setup.


Syntax to display Help Text:

{!$ObjectType.objectName__c.Fields.fieldName__c.inlineHelpText}

Create Visual force page: Copy and paste below sample code and click on Save button

<apex:page standardController="Account">
  <apex:pageBlock >
    <apex:form >
        <apex:pageBlockSection >
            <apex:pageBlockSectionItem helpText="{!$ObjectType.Account.Fields.LightingNitish__Account_Address__c.InlineHelpText}">
                <apex:outputLabel value="{!$ObjectType.Account.Fields.LightingNitish__Account_Address__c.Label}" />
                <apex:inputField value="{!Account.LightingNitish__Account_Address__c}" />
            </apex:pageBlockSectionItem>
        </apex:pageBlockSection>
    </apex:form>
  </apex:pageBlock>
</apex:page>


Click on Preview button of visualforce page
Or 
You can Go to the URL and type (Change the yoursalesforceinstance with your salesforce org URL) and add any account valid record id.


https://yoursalesforceinstance.com/apex/VisualForcePageName.

Output:


Note: If you use “showHeader=false” in <apex:Page> then helpText is not displayed.

Here in above code you might confuse about field LightingNitish__Account_Address__c. 
LightingNitish__Account_Address__c is a combination of namespace and API name.
LightingNitish is my org namespace and then Account_Address__c custom field API name.

Other way to help text in Visual force page:


1. <apex:inputField> and <apex:outputField> shows help Text bubble when nested within a <apex:pageBlockSection> component automatically.
but in order to do this, you need to include a <apex:PageBlockSection> nested in a <apex:PageBlock> tag as well.

However, there are two scenarios where helpText Bubble is not displayed in the VisualForce page.

  1. If we use "Label" attribute of <apex:outputField> , then helpText bubble is not displayed in visualforce page.
  2. If we set "showHeader=false"  of <apex:Page>, in that case also helpText bubbles is not displayed in visualforce page.
Here I came up with my own idea to display help text at VF page with above two scenarios:


<div id="mainAccountContent">

    Sample help Text Example

    <span class="CustomHelpTextExample">

<img src="/HelpTextExample.gif" alt="Help" class="helpIcon" title="$ObjectType.Account.Fields.LightingNitish__Account_Address__c.InlineHelpText"/>

    </span>
</div>

By Providing "$ObjectType.Account.Fields.LightingNitish__Account_Address__c.InlineHelpText" in TITLE attribute of <img> tag.
The helpText will be displayed as ToolTip Text.

You do not need to use <apex:PageBlockSection> tag.

Also in above code I used field LightingNitish__Account_Address__c. 
LightingNitish__Account_Address__c is a combination of namespace and API name. LightingNitish is my org namespace and then Account_Address__c custom field API name.

2. Use the <apex:pageBlockSectionItem> tag with attribute helpText filled. 
You can then "override" it or better say use you own custom help text independent of another one from the custom field:

<apex:pageBlock>
    <apex:pageBlockSection>
        <apex:pageBlockSectionItem helpText="Your custom help text.">
            <apex:outputLabel value="Account Name"/>
            <apex:inputText value="{!Account.Name}" />
        </apex:pageBlockSectionItem>
    </apex:pageBlockSection>
</apex:pageBlock>

It looks like this then:


3. Display help text entered in the custom field under "Help Text". This text visible if you use a pageBlock together with an outputField:

<apex:pageBlock>
    <apex:pageBlockSection>
        <apex:outputField value="{!Account.Account_Address__c }" />
    </apex:pageBlockSection>
</apex:pageBlock>

Enjoy! If you have any questions, comments etc. please feel free to let me know. As always, please feel free to get in touch me as I would be more than happy to assist you with any of your Salesforce development needs.


Next post: Secret Trick To Retrive Fields For Sobject Using Apex